
Lighting Plots 2
So now that you’ve got the free program AVSnap installed and created a library of symbols for your lighting fixtures, now what?
Here are some steps and thoughts to get you started creating a BASIC lighting design. By basic, I mean a design whose goal is simply visibility.
1. Do an inventory of your lighting system.
How many of each fixture do you have? What degree angle are they? How many dimming channels do you have available and what is their power capacity? Where can you mount lights? All of this information will be needed when you put together your design.
2. Define the zones that need to be lit.
Where will people be on stage? Where does the pastor walk? Where is the band located, the choir, etc? A zone could be as broad as “front of stage wash,” or as specific as “the drums.”
3. Decide how many fixtures are needed to light each zone. This should be decided based on things like what fixtures you have (light output, degrees, etc.), where they can be mounted in your facility and how you want the lighting for that zone to look, and obviously how big a particular zone is.
Since we are assuming basic lighting for visibility I would recommend a minimum of 3 lights for each zone. These would be Key, Fill and Back light. Even though I call it key and fill, in this case these are probably going to be two complimentary lights that are evenly spaced to provide even light from the front. See the example diagram below.
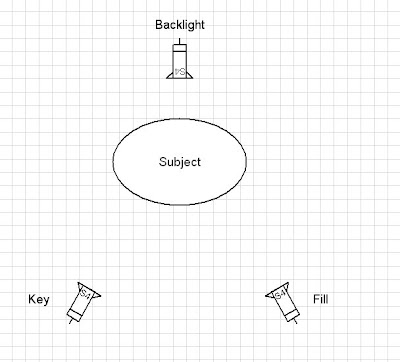
The purpose of using two lights from the front is to remove any strong shadows on the face. If you only had one light coming from the front, as the subject turns from side to side there would be a strong shadow on their face on the side that turns away from the light.
The reason you need a back light is to add 3 dimensionality to the subject. Without back light the subject will look flat. Back light adds nice highlights that make the subject look much more natural and real. If you’ve never used back light before, give it a try, it can make a mediocre lighting design pop.
4. Put all this information in to a layout in AVSnap. Add information that will be useful for you in the future, like what the degree angle of each fixture is and what DMX channel is controlling it. You can also specify what color gel is loaded in the fixture if you are using colored gels.
Once you have your lighting plot created in AVSnap, print it out and take it along with you as you hang, aim and focus your lights. Make any notes about changes that you make on the print out so that later you can go back and translate that in to your AVSnap file. Sometimes, as your focusing the lights you’ll realize that you need to make a change to the design. For instance, you may need more fixtures to cover a given zone, or once you see the color of gel you decide you don’t like it. Write these down on the print out so that later you can print out a fresh plot to use for programming.